Getting nutritious meals on the table during a busy week can feel like a monumental task. That’s where the humble lentil and the magic of batch cooking come into play. Spending a little time prepping a big batch of lentils over the weekend, or whenever you have a spare hour, can set you up for quick, easy, and affordable meals throughout the week. It’s a simple strategy that pays dividends in saved time and reduced stress when hunger strikes and time is short.
Lentils are nutritional powerhouses – packed with protein, fiber, and essential minerals. They’re also incredibly versatile and budget-friendly. By cooking a large quantity at once, you create a ready-to-use ingredient that can be transformed into countless dishes with minimal effort later on. Think less time hovering over the stove on a Tuesday night and more time enjoying your food or relaxing.
Why Embrace Batch Cooking Lentils?
The benefits extend beyond just saving time on weeknights. Batch cooking lentils:
- Saves Money: Dried lentils are significantly cheaper than their canned counterparts, and far less expensive than many other protein sources. Cooking them yourself from dried offers serious savings.
- Reduces Food Waste: Having cooked lentils on hand makes it easier to throw together meals using other ingredients you need to use up, preventing forgotten veggies from wilting in the crisper drawer.
- Promotes Healthier Eating: When you have a healthy base like cooked lentils ready to go, you’re less likely to reach for less nutritious convenience foods. It’s easier to whip up a lentil salad or add them to soup than to order takeout.
- Offers Ultimate Convenience: Imagine coming home tired and hungry, and knowing you have perfectly cooked lentils waiting in the fridge or freezer. That’s meal prep gold! They can be added cold to salads, reheated quickly, or incorporated into simmering dishes.
- Provides Meal Flexibility: Unlike a fully prepped meal, a batch of plain cooked lentils is a blank canvas. You can decide later in the week whether they become part of a soup, a salad topping, tacos, or a veggie patty.
Choosing the Right Lentils for the Job
Not all lentils are created equal when it comes to batch cooking, especially if you want them to hold their shape. Here’s a quick rundown:
- Brown or Green Lentils: These are generally the best all-rounders for batch cooking. They hold their shape reasonably well after cooking, making them ideal for salads, grain bowls, soups, and stews where you want distinct lentils rather than mush. Cooking time is typically 20-30 minutes.
- Red or Yellow Lentils: These lentils cook much faster (10-15 minutes) and tend to break down and become soft and creamy. While delicious for dals, soups, curries, and purees, they aren’t the best choice if you want firm, whole lentils for salads. You *can* batch cook them, but be mindful of their tendency to get mushy.
- Puy Lentils (French Green Lentils): These small, dark, speckled lentils are prized for holding their shape exceptionally well after cooking. They have a peppery flavour and firm texture, perfect for salads and side dishes. They take a bit longer to cook, around 25-35 minutes.
- Black Beluga Lentils: Similar to Puy lentils, these tiny black lentils retain their shape and have a firm texture. They look a bit like caviar and are excellent in salads or as a bed for fish or vegetables. Cooking time is about 20-25 minutes.
For general-purpose batch cooking where you might use the lentils in various ways, brown or green lentils are often the most versatile starting point. Puy or Beluga are fantastic if salads are your primary goal.
The Batch Cooking Method: Step-by-Step
1. Rinse and Sort
Always start by rinsing your dried lentils thoroughly under cold running water using a fine-mesh sieve. This removes any dust or debris. While rinsing, quickly pick through them to remove any small stones or damaged lentils that might have slipped through the packaging process. It’s rare, but it’s worth the quick check.
2. Choose Your Cooking Vessel
You have options here:
- Stovetop: The classic method. You’ll need a large pot with a lid. This gives you good control over the cooking process.
- Pressure Cooker (Instant Pot): This is significantly faster. Cooking times vary greatly depending on the type of lentil and the specific pressure cooker, but it can cut cooking time by more than half. Consult your manufacturer’s guide, but as a rough estimate, brown/green lentils might take 8-12 minutes at high pressure with a natural release.
- Slow Cooker: While possible, it’s generally not the most efficient method for plain lentils as they cook relatively quickly anyway. It can be useful if you’re making a large lentil soup or stew directly.
We’ll focus primarily on the stovetop method as it’s universally accessible.
3. Get the Ratio Right
The general ratio for cooking most lentils (brown, green, Puy, Beluga) on the stovetop is 1 part lentils to 3 parts water or broth. For example, use 3 cups of liquid for every 1 cup of dried lentils. Red lentils often need less liquid, perhaps closer to a 1:2 ratio, as they cook down more.
Using vegetable or chicken broth instead of water adds a layer of flavour right from the start, but water works perfectly fine too, especially if you plan to add lots of seasoning later.
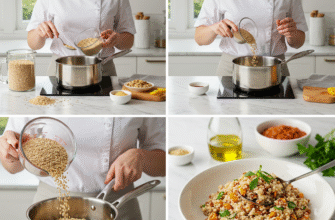
4. Cook to Perfection
Stovetop Instructions:
- Place the rinsed lentils and your chosen liquid (water or broth) in a large pot.
- Add any basic aromatics if desired (see next section).
- Bring the liquid to a boil over medium-high heat.
- Once boiling, reduce the heat to low, cover the pot tightly, and let the lentils simmer gently.
- Simmering times vary:
- Red Lentils: 10-15 minutes
- Brown/Green Lentils: 20-30 minutes
- Puy/Black Beluga Lentils: 20-35 minutes
- Start checking for doneness towards the lower end of the time range. Lentils should be tender but not mushy (unless you’re cooking red lentils for puree). Taste one! If they are still hard, continue simmering, checking every few minutes.
- Avoid vigorous boiling, as this can cause the lentils to break apart prematurely. A gentle simmer is key.
- Do NOT add salt or acidic ingredients (like lemon juice or vinegar) at the beginning of cooking. This can toughen the skins and significantly increase cooking time. Salt them after they are tender.
5. Drain (If Necessary)
Once tender, drain off any excess cooking liquid using your fine-mesh sieve. Some people like to keep a bit of the cooking liquid if storing, believing it helps keep them moist, but draining thoroughly is generally recommended for most uses and better storage, especially for freezing.
Basic Flavoring During Cooking
While you should avoid salt until the end, you can add simple aromatics to the cooking water for a subtle background flavour. These won’t overpower the lentils, allowing versatility later.
- A bay leaf
- A peeled clove or two of garlic (left whole)
- A quartered onion
- A stalk of celery or a carrot chunk
Remove and discard these aromatics after cooking and before storing the lentils.
Storing Your Lentil Bounty
Cooling is Key
Before storing, spread the cooked and drained lentils out on a baking sheet in a single layer. This helps them cool down quickly and evenly, preventing them from steaming further in a container and becoming mushy. Let them cool to room temperature (this usually takes about 20-30 minutes).
Refrigeration
Once cooled, transfer the lentils to airtight containers. Portioning them into smaller containers based on how much you typically use at once can be very convenient. Cooked lentils will generally last for 3 to 5 days in the refrigerator.
Verified Storage Safety: Always store cooked lentils in airtight containers in the refrigerator below 40°F (4°C). Ensure they are cooled properly before storing to minimise bacterial growth. Discard any lentils that smell off, look slimy, or have visible mold. Proper storage ensures your batch-cooked lentils remain safe and delicious to eat throughout the week.
Freezing for Longer Storage
Lentils freeze beautifully! This is perfect for extending their shelf life if you make a very large batch.
- Ensure lentils are completely cool and relatively dry (pat them gently with paper towel after draining if needed, though usually unnecessary if drained well).
- Portion lentils into freezer-safe bags or containers. Freezer bags are great because you can lay them flat to save space and they thaw quicker.
- Press out as much air as possible before sealing the bags.
- Label the bags/containers with the date.
- Frozen cooked lentils are best used within 3 to 6 months for optimal texture and flavour. They remain safe longer if kept consistently frozen, but quality may decline.
To thaw, simply move a container or bag from the freezer to the refrigerator overnight. For quicker thawing, you can place a sealed bag in a bowl of cold water or use the defrost setting on your microwave.
Putting Your Cooked Lentils to Work
Now for the fun part! What can you do with your readily available cooked lentils?
- Salads: Toss cold lentils with chopped vegetables, herbs, feta cheese, and a vinaigrette for a hearty lunch.
- Soups and Stews: Add them towards the end of cooking time to bulk up vegetable soups, minestrone, or chili.
- Grain Bowls: Use them as a protein base alongside roasted vegetables, grains (like quinoa or rice), and a tasty sauce.
- Tacos, Burritos, and Wraps: Season them with taco spices and use as a filling.
- Veggie Burgers and Loaves: Mash some of the lentils to act as a binder for homemade patties or loaves.
- Dips and Spreads: Blend with herbs, garlic, lemon juice, and olive oil for a simple dip.
- Pasta Sauce Extender: Stir into tomato-based pasta sauces for added texture and protein.
- Simple Side Dish: Reheat gently with a little olive oil, salt, pepper, and herbs.
Quick Troubleshooting
- Mushy Lentils: You likely overcooked them or used red/yellow lentils when you wanted firm ones. Next time, reduce cooking time or choose brown/green/Puy lentils. Vigorous boiling can also contribute.
- Undercooked/Hard Lentils: They need more cooking time. Ensure you used enough liquid and didn’t add salt or acid too early. Sometimes older lentils can take longer to soften. Just keep simmering gently until tender.
- Uneven Cooking: Ensure lentils are fully submerged in liquid and simmer gently, not rapidly boil. Stir occasionally if needed, but gentle simmering usually prevents sticking without breaking them up.
Batch cooking lentils is a straightforward process that unlocks a world of quick and easy meal possibilities. By investing a small amount of time upfront, you equip yourself with a versatile, healthy, and cost-effective ingredient ready to enhance your meals all week long. Give it a try – your future self will thank you!


