Ditching dairy doesn’t mean ditching yogurt! Making your own creamy, tangy coconut yogurt at home is surprisingly straightforward and incredibly rewarding. Forget the often pricey store-bought versions with ingredients you can’t pronounce. With just a couple of key items and a little patience, you can whip up a batch of delicious, gut-friendly yogurt tailored exactly to your liking. It’s a simple process that opens up a world of breakfast bowls, smoothie additions, and creamy sauces.
Why bother making it yourself? Control, mainly. You choose the coconut milk, ensuring it’s full-fat and free from unnecessary gums or sweeteners if that’s your preference. You control the tanginess by adjusting the fermentation time. You control the sweetness and flavor, adding them only after the culturing process is complete. Plus, there’s a certain satisfaction in nurturing a batch of live cultures into a thick, spoonable treat.
Gathering Your Supplies: Ingredients and Tools
The ingredient list is refreshingly short, but the quality matters, especially regarding the coconut milk.
Essential Ingredients:
- Full-Fat Coconut Milk: This is non-negotiable for a creamy result. Look for canned coconut milk (usually found in the international foods aisle) with the highest fat percentage you can find. Check the ingredients – ideally, it should contain only coconut and water. Some brands include guar gum, which is acceptable and can aid thickness, but avoid those with lots of other additives or sweeteners. You’ll typically need one or two standard 13.5 oz (400ml) cans.
- Probiotic Source: You need live bacteria to culture the milk into yogurt. You have two main options:
- Probiotic Capsules: Choose a high-quality, dairy-free probiotic capsule. You’ll typically need the powder from 2-4 capsules per can of coconut milk. Ensure they contain live active cultures like Lactobacillus acidophilus, Bifidobacterium lactis, or specific yogurt strains like Lactobacillus bulgaricus and Streptococcus thermophilus (though the latter two technically thrive best on lactose, many find other strains work fine for coconut yogurt).
- Yogurt Starter Culture: You can buy specific vegan yogurt starter cultures online or from health food stores. Follow the package instructions for the amount needed.
Optional, but Recommended for Thickness:
- Thickener: Coconut milk doesn’t contain lactose or the same proteins as dairy milk, so it won’t naturally thicken to the same consistency. While chilling helps immensely, adding a thickener before culturing guarantees a richer texture. Common choices include:
- Tapioca Starch (or Arrowroot Powder): Use about 1-2 tablespoons per can of coconut milk. This needs to be heated with the milk to activate.
- Agar-Agar Powder: A seaweed-derived gelling agent. Use sparingly, about 1/2 to 1 teaspoon per can, as too much can result in a jelly-like texture. This also requires heating.
Equipment You’ll Need:
- Clean Glass Jar(s): Mason jars work perfectly. Ensure they are spotlessly clean or sterilized (run through a hot dishwasher cycle or rinse with boiling water).
- Whisk or Spoon: Use a non-metallic utensil (wood or silicone) for stirring in the probiotics, as metal can sometimes react negatively with the cultures.
- Saucepan (if using thickener): Needed for heating the coconut milk and thickener.
- Thermometer (Recommended): Crucial for ensuring the milk is at the correct temperature before adding probiotics if you’ve heated it.
- Incubation Method: You need a way to keep the yogurt consistently warm (around 105-115°F or 40-46°C) for several hours. Options include:
- Yogurt Maker: The most straightforward option.
- Instant Pot: Many models have a ‘Yogurt’ setting.
- Oven: With the light turned on (check the temperature first!).
- Dehydrator: Set to the appropriate low temperature.
- Warm Spot: A consistently warm spot in your house, perhaps wrapped in towels and placed in a turned-off microwave or insulated cooler. Temperature consistency is key here.
The Culturing Process: Step-by-Step
Alright, let’s turn that coconut milk into tangy goodness. Remember, cleanliness is key throughout this process to avoid introducing unwanted bacteria.
Step 1: Prepare the Coconut Milk
Shake the cans of coconut milk vigorously. Open and pour the contents into your saucepan (if using a thickener) or directly into your clean glass jar (if skipping the thickener). If using canned milk, whisk thoroughly to combine the separated cream and water into a smooth liquid. If you find solid chunks of coconut cream, gently warming the milk slightly (even if not using a thickener) can help it combine smoothly – just ensure it cools back down before adding probiotics.
Step 2: Add Thickener (Optional)
If using tapioca starch or agar-agar, whisk it into the cold coconut milk in the saucepan until no lumps remain. Heat the mixture over medium heat, whisking constantly, until it starts to bubble gently and thickens slightly (usually just a few minutes). Don’t bring it to a rolling boil for too long. Once thickened, remove from heat immediately.
Step 3: Cool Down (Crucial!)
Whether you heated the milk with a thickener or just warmed it slightly to combine, you must let it cool down. The ideal temperature for adding probiotics is between 100-110°F (38-43°C). Use a thermometer to check. If it’s too hot, it will kill the beneficial bacteria. If it’s too cold, they won’t activate effectively. This cooling step might take 30 minutes to an hour on the counter, depending on how hot it got.
Temperature Alert! Be absolutely certain your coconut milk has cooled to the correct temperature (around 100-110°F or 38-43°C) before adding your probiotics. Temperatures above 115°F (46°C) can kill the beneficial bacteria, preventing your yogurt from culturing properly. Patience during the cooling step is key to success; don’t rush this part.
Step 4: Introduce the Probiotics
Once the coconut milk is at the target temperature, it’s time for the magic. If using capsules, carefully open them and empty the powder into the milk. If using a starter culture, measure it according to package directions. Using your non-metallic whisk or spoon, gently but thoroughly stir the probiotics into the milk until well combined. Avoid vigorous whisking at this stage.
Step 5: Incubate
Pour the probiotic-infused coconut milk into your clean glass jar(s). Seal the jars loosely (if using screw-top lids, don’t tighten them all the way, or use cheesecloth secured with a rubber band) to allow gases produced during fermentation to escape. Place the jars into your chosen incubation environment (yogurt maker, Instant Pot, warm oven, etc.).
Let the mixture incubate undisturbed at a consistent warm temperature (again, aim for that 105-115°F or 40-46°C range) for 12 to 24 hours. Some setups might even take up to 36 hours.
- Shorter time (12-18 hours): Results in a milder yogurt.
- Longer time (18-24+ hours): Develops a tangier, more traditional yogurt flavor.
Step 6: Check for Readiness
After the incubation period, check your yogurt. It should look thickened (though it will thicken more upon chilling) and may have pulled away slightly from the sides of the jar. It should smell pleasantly tangy, like yogurt, perhaps with a subtle coconut aroma. It might not look perfectly smooth yet – that’s okay. If it still seems very thin or smells just like coconut milk, it might need a few more hours of incubation.
Step 7: Chill to Set
This step is vital for achieving the final thick, creamy texture. Carefully remove the jars from the incubator (try not to jostle them too much) and tighten the lids. Place them in the refrigerator for at least 6-8 hours, or preferably overnight. Chilling allows the yogurt to fully set and thicken.
Step 8: Flavor and Serve (Optional)
Once chilled, your homemade coconut yogurt is ready! Give it a gentle stir before serving. Any separation (a bit of clear liquid) is normal; just stir it back in. Now is the time to add any sweeteners like maple syrup or date paste, vanilla extract, fruit puree, or other flavorings. Adding them before culturing can sometimes interfere with the fermentation process.
Troubleshooting Common Issues
Sometimes things don’t go exactly as planned. Don’t despair! Here are solutions to common hiccups:
- My yogurt didn’t thicken: This is the most common issue. Potential causes include:
- Temperature Issues: Milk was too hot when probiotics were added (killed them), or incubation temperature was too low/inconsistent (cultures didn’t thrive).
- Inactive Probiotics: The capsules or starter might have been old or ineffective.
- Wrong Coconut Milk: Used light coconut milk or one with too many stabilizers that interfered with culturing. Always use full-fat.
- Incubation Time: Maybe it just needed more time.
- My yogurt is lumpy: This can happen if the coconut cream wasn’t fully incorporated initially or if it wasn’t stirred well after chilling. A good whisk after chilling usually solves this.
- My yogurt separated (clear liquid): A bit of whey separation is completely normal for homemade coconut yogurt. Simply stir it back in before serving.
- It’s too tangy / Not tangy enough: This is purely down to incubation time. Adjust the duration on your next batch – less time for milder, more time for tangier.
Storage and Enjoyment
Store your homemade coconut yogurt in an airtight container (the jar you made it in is perfect) in the refrigerator. It should keep well for about 7 to 10 days. The tanginess might increase slightly over time.
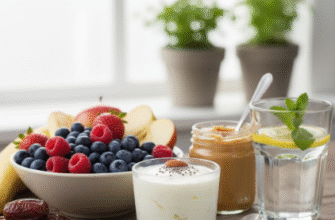
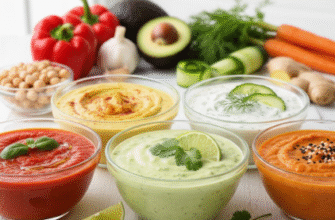
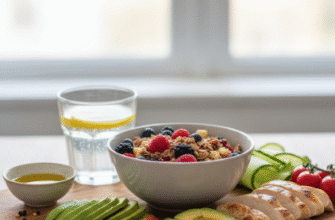
Enjoy your creation! Serve it with granola and fresh berries, blend it into smoothies for extra creaminess, use it as a base for dips and sauces, dollop it onto curries, or simply savor it plain. The possibilities are endless, and the satisfaction of making it yourself is the best topping of all.
Making coconut yogurt at home is a journey of discovery. Your first batch might not be perfect, but learning the nuances of temperature, timing, and ingredients is part of the fun. Give it a try – you might just get hooked on creating your own dairy-free deliciousness.
“`