Tired of opening cans? Looking for a way to eat healthier, save money, and have delicious, versatile ingredients ready to go? Let’s talk about batch cooking navy beans. These little white beans are nutritional powerhouses, packed with fiber, protein, and essential minerals. Cooking them from dried might seem daunting, but doing a big batch at once is incredibly efficient and rewards you with far superior texture and flavor compared to their canned counterparts. Plus, think of all the meals you’ll have covered for the week!
Making a large quantity of navy beans means you do the ‘work’ (which is mostly hands-off time) once, and reap the benefits multiple times. Cooked navy beans can be incorporated into soups, stews, salads, dips, baked beans, and even veggie burgers. Having them pre-cooked in your fridge or freezer is a game-changer for quick weeknight meals or last-minute lunches.
Why Bother with Dried Beans?
Sure, canned beans are convenient. But dried beans offer several distinct advantages, especially when you batch cook:
- Cost-Effective: A bag of dried navy beans costs significantly less per serving than canned beans. You get way more bang for your buck.
- Superior Flavor and Texture: Home-cooked beans simply taste better. They have a creamier texture and a more nuanced flavor because you control the cooking process and seasoning from the start. Canned beans can sometimes be mushy or have a slightly metallic taste.
- Control Over Sodium: Canned beans are often packed in salty brine. When you cook your own, you control the amount of salt added, making them a healthier option. You can even cook them without any salt initially and add it later depending on the recipe.
- Reduced Waste: Less packaging waste compared to buying multiple cans.
Step 1: Sorting and Rinsing
Before you even think about soaking or cooking, pour your dried navy beans onto a large baking sheet or a clean counter. Spread them out in a single layer. Carefully pick through them, looking for any small stones, debris, or damaged/discolored beans. It sounds tedious, but it usually only takes a minute or two, and it’s crucial to avoid biting down on something unpleasant later. Once sorted, place the beans in a colander and give them a thorough rinse under cold running water to remove any dust or surface dirt.
Step 2: The Importance of Soaking (and How to Do It)
Soaking navy beans before cooking is highly recommended. It serves several purposes: it rehydrates the beans, ensuring they cook more evenly, it shortens the overall cooking time, and it helps break down some of the complex sugars (oligosaccharides) that can cause digestive discomfort for some people. You have two main soaking options:
The Long Soak (Overnight Method)
This is the preferred method for the best texture and digestibility. Place your rinsed beans in a large bowl or pot. Add cold water to cover the beans by at least 2-3 inches. Beans expand quite a bit as they soak, so make sure your container is large enough! Cover the bowl and let the beans soak at room temperature for 8-12 hours, or simply leave them overnight. If your kitchen is very warm, you might prefer to soak them in the refrigerator. Before cooking, drain the soaking water and give the beans another quick rinse.
The Quick Soak Method
Forgot to soak the beans overnight? No problem! Place the rinsed beans in a large pot. Cover with water by about 2 inches. Bring the water to a rolling boil and boil the beans for 2-3 minutes. Remove the pot from the heat, cover it tightly with a lid, and let the beans stand in the hot water for 1 hour. After an hour, drain the soaking water, rinse the beans, and they are ready to be cooked.
Did you know? Batch cooking dried beans like navy beans is not only incredibly economical, but it also gives you complete control over the ingredients. You avoid the added sodium and preservatives often found in canned varieties. Plus, having cooked beans ready makes healthy meal prep significantly easier throughout the week.
Step 3: Cooking Your Navy Beans
Now that your beans are sorted, rinsed, and soaked, it’s time to cook them! You have several methods to choose from, depending on your equipment and preference.
Stovetop Method
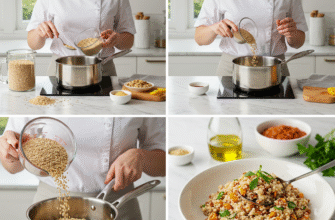
This is the classic method. Place your soaked and rinsed beans in a large, heavy-bottomed pot (like a Dutch oven). Add fresh water or broth to cover the beans by about 1-2 inches. At this stage, you can add aromatics for flavor – think a halved onion, a few cloves of garlic (smashed), a bay leaf, or even a sprig of rosemary. Do not add salt or acidic ingredients (like tomatoes or vinegar) yet, as this can prevent the beans from becoming tender.
Bring the water to a gentle boil, then immediately reduce the heat to low, so the water is barely simmering. You want gentle bubbles, not a rolling boil which can break the beans apart. Partially cover the pot, leaving the lid slightly ajar to allow steam to escape. Let the beans simmer gently. Cooking time will vary depending on the age and size of the beans, and whether you used the long or quick soak method, but generally, plan for 1 to 2 hours. Start checking for tenderness after about 1 hour.
Keep an eye on the water level, adding more hot water if needed to keep the beans submerged. You might notice some foam forming on the surface, especially early on – you can skim this off with a spoon if you like. To check for doneness, scoop out a few beans and taste them. They should be creamy and tender all the way through, with no chalkiness or firmness in the center. Once tender, you can stir in salt to taste (start with about 1 teaspoon per pound of dried beans and adjust).
Slow Cooker Method
The slow cooker is fantastic for hands-off bean cooking. Place the soaked and rinsed beans in your slow cooker insert. Add fresh water or broth to cover by 1-2 inches, along with any desired aromatics (onion, garlic, bay leaf). Again, hold off on the salt for now. Cook on LOW for 6-8 hours or on HIGH for 3-4 hours. Cooking times can vary between slow cooker models, so start checking for tenderness towards the end of the recommended time. Once tender, stir in salt to taste.
Pressure Cooker (Instant Pot) Method
This is the fastest method by far. Place soaked and rinsed beans in the inner pot of your electric pressure cooker. Add fresh water or broth – usually enough to cover by about 1 inch (check your cooker’s manual, as you typically need less water than stovetop). Add aromatics if desired. Secure the lid, ensure the steam release valve is set to ‘Sealing’. Cook on High Pressure for 8-15 minutes for soaked beans. The exact time depends on bean freshness and your desired tenderness. It’s often better to slightly undercook and add a few more minutes than to overcook into mush. Allow the pressure to release naturally (NPR) for at least 15-20 minutes before performing a quick release for any remaining pressure. Natural release helps keep the beans intact. Once done, carefully open the lid, remove aromatics, and stir in salt to taste.
Step 4: Seasoning Ideas Beyond Salt
While salt is essential, don’t stop there! Cooked navy beans are a blank canvas:
- Herbs: Add fresh parsley, cilantro, thyme, or rosemary after cooking.
- Spices: Stir in cumin, chili powder, smoked paprika, or black pepper.
- Aromatics During Cooking: Onion, garlic, bay leaves, celery, carrots (remove before storing unless desired).
- Fat/Oil: A drizzle of good quality olive oil after cooking adds richness.
- Acidity: A splash of lemon juice or vinegar right before serving can brighten the flavor (add after cooking).
Step 5: Cooling and Storing Your Batch
Once your beans are perfectly tender and seasoned (or left plain for versatility), proper storage is key.
Cooling: Let the beans cool completely in their cooking liquid. This helps them stay moist and absorb more flavor. You can speed this up by transferring them to shallower containers or placing the pot in an ice bath, but don’t put a large, hot pot directly into the fridge as it can raise the internal temperature unsafely.
Refrigeration: Once cool, transfer the beans along with some of their cooking liquid into airtight containers. Store them in the refrigerator for up to 4-5 days. The cooking liquid helps prevent them from drying out.
Freezing: Cooked navy beans freeze beautifully! Portion the cooled beans (with some liquid) into freezer-safe containers or heavy-duty freezer bags. Leave a little headspace for expansion. Label with the date. They will keep well in the freezer for up to 6 months. To use, thaw them overnight in the refrigerator or use a defrost setting on your microwave.
Important Storage Note: Always cool cooked beans completely before refrigerating or freezing. Storing warm beans can create an environment for bacteria to grow. Ensure your storage containers are airtight to maintain quality and prevent freezer burn.
Using Your Batch-Cooked Navy Beans
Now for the fun part! What can you do with your stash of delicious, home-cooked navy beans?
- Classic Baked Beans: The perfect base for homemade baked beans.
- Soups and Stews: Add them to minestrone, chili, vegetable soup, or create a creamy white bean soup.
- Salads: Toss them into green salads, pasta salads, or bean salads for a protein boost.
- Dips and Spreads: Blend them into a creamy white bean hummus or dip.
- Side Dishes: Serve them simply seasoned as a healthy side.
- Veggie Burgers/Loaves: Mash them as a binder and base for plant-based patties.
- Pasta Dishes: Add them to pasta sauces or dishes like pasta e fagioli.
Batch cooking navy beans is a simple, rewarding process that sets you up for easy, healthy, and delicious meals. It takes a little planning, but the mostly hands-off cooking time yields fantastic results that far surpass canned beans in taste, texture, and value. Give it a try – you might just ditch the cans for good!


