
Content
The Magic of a Homemade Mix: Beyond the Box
Let’s be honest, standard boxed brownie mixes are convenient, but a quick glance at the ingredient list can sometimes be alarming. Often high in refined sugar and white flour, they might also contain artificial flavours or preservatives. Creating your own mix puts you firmly in the driver’s seat. Ingredient Control: This is the biggest win. You choose the type of flour, the kind and amount of sweetener, the quality of the cocoa powder, and any fun add-ins. Want organic ingredients? Go for it. Need to accommodate a dietary preference like using a gluten-free flour blend? You can tailor the mix perfectly. Reducing the sugar is a primary goal here, allowing the deep chocolate flavour to shine through without being overwhelmingly sweet. Cost-Effectiveness: While some individual healthier ingredients might seem pricier upfront (like almond flour or coconut sugar), buying them in larger quantities to make multiple batches of mix often works out cheaper than buying specialized ‘healthy’ or ‘keto’ brownie mixes from the store, which can carry a premium price tag. Convenience Redefined: Imagine having jars of this mix lined up in your pantry. Instant brownie gratification is just a few wet ingredients away. It is perfect for busy weeknights, unexpected guests, or when you simply need a quick chocolate fix. It also makes a fantastic, thoughtful homemade gift – just package it in a nice jar with baking instructions attached. That ‘Made From Scratch’ Feeling (Almost!): Even though you started with a mix, because *you* made the mix, the final brownies feel more wholesome and satisfying than simply opening a box. You know exactly what went into them.What Makes *This* Mix Lean Towards ‘Healthy’?
It is important to remember that a brownie is still a treat! We are not trying to turn it into a salad. However, we can make smarter choices with the ingredients to create a version that is more satisfying, offers a little more nutritional value, and significantly cuts down on the refined sugar compared to traditional recipes or mixes. Lower Sugar Focus: This is the cornerstone. Standard brownie recipes can call for copious amounts of sugar, sometimes up to two cups! Our mix dramatically reduces this, often using less than a cup. This not only lowers the overall sugar content but also allows the complex flavours of the cocoa and any added chocolate to be the stars. Whole Grain Power (Optional but Recommended): Instead of relying solely on refined white all-purpose flour, which offers little nutritional value beyond carbohydrates, this mix often incorporates whole wheat flour (like white whole wheat or whole wheat pastry flour for a lighter texture) or alternative flours like oat flour. These bring extra fibre, a touch more protein, and a subtle nutty flavour that complements the chocolate beautifully. Quality Cocoa: Using unsweetened cocoa powder is key. Opting for a good quality brand, whether natural or Dutch-processed (more on that later), provides intense chocolate flavour without any added sugars or fillers. The antioxidants naturally present in cocoa are a nice little bonus, too. It’s about making incremental improvements and enjoying a beloved treat in a more balanced way. You get the fudgy texture and deep chocolate taste, just with a little less of the stuff we are often trying to moderate, like excessive sugar and refined flour.Choosing Your Foundation: The Flour
The flour forms the structure of your brownies. While traditional recipes use all-purpose white flour, switching things up can add nutritional benefits and interesting flavour notes. Whole Wheat Pastry Flour: This is often my top choice for ‘healthier’ baking when I still want a relatively tender result. It is milled from soft white wheat and contains the whole grain (bran, germ, endosperm) but has a lower protein content than regular whole wheat, making it less heavy. It provides fibre and nutrients without making the brownies overly dense. White Whole Wheat Flour: Another excellent option. It is nutritionally similar to regular whole wheat flour but is milled from a lighter-coloured wheat variety, resulting in a milder flavour and lighter colour that many people prefer in baked goods. Regular Whole Wheat Flour: You can certainly use standard whole wheat flour. It will result in a heartier, denser brownie with a more pronounced nutty flavour. Some people love this rustic quality, while others might find it a bit too heavy. It definitely boosts the fibre content significantly. Oat Flour: Easily made by grinding rolled oats in a blender until fine, oat flour adds a lovely, slightly chewy texture and a mild, sweet flavour. It’s a naturally gluten-free option (ensure certified gluten-free oats if needed) and adds soluble fibre. Almond Flour: For a gluten-free and grain-free option, almond flour provides healthy fats, protein, and a moist texture. It can make brownies denser and fudgier. Often, a blend of almond flour and another gluten-free flour (like oat or a GF all-purpose blend) works well to achieve the right structure. When substituting flours, especially whole grain or gluten-free options, be aware that they absorb liquid differently than white flour. The final brownie texture might vary slightly, which is all part of the fun of experimenting!Tackling the Sweetness: Less is More
This is where we make the biggest impact for a ‘lower sugar’ brownie. Forget the cup-and-a-half or two cups of sugar found in many recipes. We are aiming significantly lower, often around three-quarters of a cup or even slightly less, depending on your preference and the other ingredients used (like chocolate chips). Reduced Granulated or Brown Sugar: The simplest approach is to just use less regular sugar. Using brown sugar (light or dark) adds a hint of moisture and molasses flavour compared to white granulated sugar. Even reducing the standard amount makes a huge difference. Coconut Sugar: A popular alternative, coconut sugar functions similarly to brown sugar in recipes. It’s derived from coconut palm sap and has a lower glycemic index than white sugar, though it’s still sugar and should be used in moderation. It lends a subtle caramel note that works well with chocolate. Maple Sugar: Made by dehydrating maple sap, this offers a lovely, delicate maple flavour. It’s generally more expensive than other options but creates a delicious result. It behaves much like granulated sugar. Sugar Alternatives (Use with Caution): For those specifically looking to minimize sugar grams further, granulated substitutes like erythritol-based blends (e.g., Swerve) or monk fruit sweeteners can be used. However, be mindful that these can sometimes have a slight cooling aftertaste or affect the texture differently. It is best to use these if you are already familiar with how they bake and taste. Always follow package instructions for substitution ratios, as their sweetness intensity varies. For this general-purpose mix, we typically focus on simply *reducing* regular sugar types.Sweetness Perception Alert: Remember, ‘lower sugar’ means these brownies won’t hit that intense sugar high of typical mixes. They are designed to let the chocolate flavour dominate. If you are accustomed to very sweet treats, you might want to start here and *very slightly* increase the sweetener next time if needed, but give your taste buds a chance to adjust and appreciate the richer, less cloying taste first!The goal isn’t zero sugar, but *lower* sugar, making the brownie feel less like a pure sugar bomb and more like a deep, dark chocolate experience.
The Heart of the Brownie: Cocoa & Chocolate
No brownie is complete without that intense chocolate punch. The quality and type of cocoa powder you use make a significant difference. Unsweetened Cocoa Powder is Non-Negotiable: Never use sweetened cocoa mix (like hot chocolate powder) for baking brownies. You need pure, unsweetened cocoa powder to control the sweetness and get the right chocolate concentration. Natural vs. Dutch-Processed:- Natural Cocoa Powder: This is cocoa powder in its most basic form. It’s acidic and often lighter in colour with a sharper, fruitier chocolate flavour. Because it’s acidic, it typically reacts with baking soda in recipes to provide lift.
- Dutch-Processed (or Alkalized) Cocoa Powder: This cocoa has been treated with an alkali solution to neutralize its acidity. This results in a darker colour, a smoother, less bitter flavour, and it doesn’t react with baking soda. Recipes using Dutch cocoa usually rely on baking powder for leavening.
The Supporting Cast: Leavening, Salt, and Optional Goodies
These ingredients play crucial roles in the final texture and flavour balance. Leavening Agent: Depending on the cocoa used and desired texture (fudgy vs. cakey), the recipe will call for baking powder, baking soda, or sometimes both. Baking powder provides lift, while baking soda reacts with acidic ingredients (like natural cocoa or brown sugar) to create rise. Ensure your leavening agents are fresh for the best results. Salt: Never underestimate the power of salt in sweet recipes! A pinch of salt doesn’t make the brownies taste salty; instead, it enhances the chocolate flavour, balances the sweetness, and makes all the other ingredients pop. Fine sea salt or regular table salt works perfectly. Optional Dry Mix Add-Ins: This is where you can get creative! Consider stirring these directly into your dry mix jar:- Chopped Nuts: Walnuts and pecans are classic brownie companions, adding texture and nutty flavour. About half a cup, roughly chopped.
- Seeds: For a textural twist and a little nutritional boost, try adding a couple of tablespoons of pumpkin seeds, sunflower seeds, or even hemp seeds.
- Flaxseed Meal or Chia Seeds: Adding 1-2 tablespoons of ground flaxseed or chia seeds can increase fibre and omega-3s. They also help slightly with binding when the wet ingredients are added.
- Unsweetened Shredded Coconut: For a subtle tropical note.
- Dried Fruit: Unsweetened dried cherries or cranberries can add chewy tartness, but be mindful they also contribute natural sugars. Chop them if large.
- Instant Coffee/Espresso Powder: A teaspoon or two dissolved enhances the chocolate flavour without making it taste like coffee (use more for a distinct mocha flavour). Add this powder directly to the dry mix.
Putting Your Mix Together: The Recipe (Dry Ingredients)
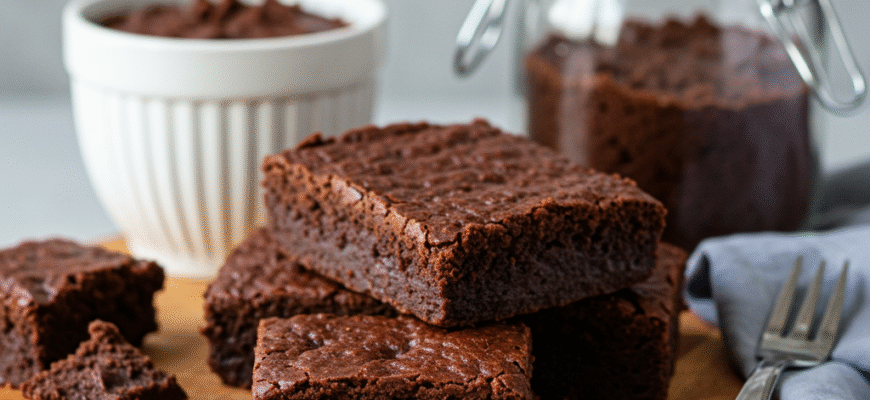
Here’s a sample recipe for your lower-sugar brownie mix. Feel free to adjust based on the flour and sweetener choices discussed above. This makes enough mix for one standard 8×8 inch pan of brownies.Lower Sugar Brownie Dry Mix
Ingredients:- 3/4 cup Whole Wheat Pastry Flour (or White Whole Wheat, or 1/2 cup Almond + 1/4 cup Oat Flour)
- 1/2 cup Unsweetened Cocoa Powder (preferably Dutch-processed for deep flavour)
- 3/4 cup Coconut Sugar (or packed light brown sugar, or granulated sugar – adjust slightly to taste)
- 1/2 teaspoon Baking Powder
- 1/4 teaspoon Salt
- Optional: 1/2 cup Dark Chocolate Chips (60-70% cacao)
- Optional: 1/2 cup Chopped Walnuts or Pecans
- Optional: 1-2 tablespoons Flaxseed Meal
- Optional: 1 teaspoon Instant Espresso Powder
Storing Your Creation
Once you have whisked together your beautiful brownie mix, storing it properly ensures it stays fresh and ready for baking. Airtight is Key: Use a container with a tight-fitting lid. Mason jars work wonderfully and look lovely in the pantry or as gifts. Plastic containers or even sturdy resealable bags are also suitable options. Cool, Dark, and Dry: Store the mix in a cool, dark place like a pantry or cupboard, away from heat sources (like the stove) and direct sunlight. Moisture is the enemy, so ensure the container is sealed well. Label It: Don’t forget to label the container with the contents (“Lower Sugar Brownie Mix”) and the date you made it. It is also incredibly helpful to attach the baking instructions (the wet ingredients needed and baking directions) directly to the jar, perhaps on a tag or a stick-on label. Shelf Life: When stored correctly, the mix should last for several months, typically 3-6 months, depending on the freshness of your ingredients (especially the flour and baking powder). Whole grain flours generally have a shorter shelf life than white flour due to the oils in the bran and germ, so aim to use mixes made with them a bit sooner.Bringing the Brownies to Life: Baking Day!
You have your jar of homemade brownie mix ready. Now for the easy part – turning it into delicious brownies! Typical Wet Ingredients Needed (for one batch from the mix recipe above):- 2 Large Eggs (or Flax Eggs: 2 tbsp flaxseed meal + 6 tbsp water, let sit 5 mins)
- 1/2 cup Melted Coconut Oil (or melted butter, or a neutral oil like avocado oil) OR 1/2 cup Unsweetened Applesauce for an oil-free option (texture will be slightly cakier)
- 1 teaspoon Vanilla Extract
- Optional: 2-4 tablespoons Milk (dairy or non-dairy) or Brewed Coffee, if batter seems too thick
- Preheat your oven to 350°F (175°C). Grease and line an 8×8 inch baking pan with parchment paper, leaving an overhang for easy removal.
- Pour the dry brownie mix from your jar into a large mixing bowl. Give it a quick whisk to break up any clumps that may have formed during storage.
- In a separate medium bowl, whisk together the eggs (or flax eggs), melted oil (or applesauce), and vanilla extract until well combined.
- Pour the wet ingredients into the bowl with the dry ingredients. Stir gently with a spatula or wooden spoon *just* until combined. Be careful not to overmix; a few streaks of flour are okay. If the batter seems exceptionally thick, stir in 2-4 tablespoons of milk or coffee until it reaches a thick, spreadable consistency.
- Spread the batter evenly into the prepared baking pan.
- Bake for 22-28 minutes, or until a toothpick inserted into the center comes out with moist crumbs attached (not wet batter). The edges should look set and slightly pulled away from the sides of the pan. Be careful not to overbake for fudgier brownies.
- Let the brownies cool completely in the pan on a wire rack before lifting them out using the parchment paper overhang and slicing. This allows them to set properly for the best texture.


