
Content
Why Bother Making Walnut Butter at Home?
You might wonder if it’s worth the effort when you can just grab a jar off the shelf. Absolutely! Firstly, flavour. Freshly made walnut butter has an intensity and purity of taste that commercially produced versions often lack. Processing and sitting on a shelf can dull those delicate nutty notes. Secondly, ingredients. You are the boss. Just walnuts? Perfect. Want a touch of salt? Go for it. Prefer a hint of maple syrup? Your call. No unwanted extras unless you put them there. This is particularly great if you’re managing sugar intake or avoiding certain oils. Thirdly, cost can sometimes be a factor. While walnuts aren’t the cheapest nuts, buying them in bulk, especially when on sale, can make homemade butter more economical than premium store-bought organic versions. Lastly, there’s the sheer satisfaction of creating something wholesome and delicious from scratch. It’s a simple process with a truly gourmet result.Gathering Your Supplies
The beauty of this recipe lies in its simplicity. You don’t need a laundry list of obscure ingredients.Core Ingredient:
- Walnuts: About 2-3 cups (around 300-450g) of raw, shelled walnuts are a good starting point for a standard food processor. You can use halves or pieces. Ensure they are fresh; stale walnuts will result in bitter-tasting butter.
Optional Additions (Customize to your taste!):
- Salt: A pinch (start with 1/4 teaspoon) enhances the walnut flavour. Sea salt or kosher salt works well.
- Sweetener: If you like a touch of sweetness, consider 1-2 teaspoons of maple syrup, honey, or coconut sugar. Add this towards the end of processing.
- Oil: Sometimes, walnuts need a little help to get really creamy. 1-2 teaspoons of a neutral oil (like avocado, melted coconut, or even walnut oil for extra flavour) can smooth things out. Often, it’s not needed if you process long enough.
- Flavourings: Vanilla extract, cinnamon, cardamom, or even a tiny pinch of cayenne for a kick can be added at the end.
Essential Equipment:
- Food Processor: This is the key tool. A high-powered machine works best and fastest, but a standard food processor will get the job done; it just requires more patience and potentially more scraping down the sides. A blender generally doesn’t work as well unless it’s a very high-speed model specifically designed for nut butters, as the mixture can get stuck under the blades.
- Spatula: Essential for scraping down the sides of the food processor bowl.
- Airtight Jar: For storing your delicious creation.
The Walnut Butter Making Process: Step-by-Step
Alright, let’s turn those nuts into butter! It’s mostly hands-off time while the machine does the work, but you need to observe the stages.Step 1: To Toast or Not to Toast? (Highly Recommended!)
You can make walnut butter from raw walnuts, but toasting them first makes a world of difference. Toasting releases the natural oils, deepens the flavour profile (making it richer and less bitter), and helps the nuts break down more easily in the food processor. Trust me, it’s worth the extra 10 minutes. Oven Method (Preferred): Preheat your oven to 350°F (175°C). Spread the walnuts in a single layer on a baking sheet. Toast for 8-12 minutes, shaking the pan halfway through. Keep a close eye on them – nuts can go from perfectly toasted to burnt very quickly! They should smell fragrant and look slightly darker. Let them cool for about 10 minutes before processing. They should be warm, not hot. Stovetop Method: Place walnuts in a dry skillet over medium heat. Toast, stirring frequently, for 5-7 minutes until fragrant and slightly browned. Again, watch carefully to prevent burning. Let them cool slightly.Step 2: The Magic of Processing
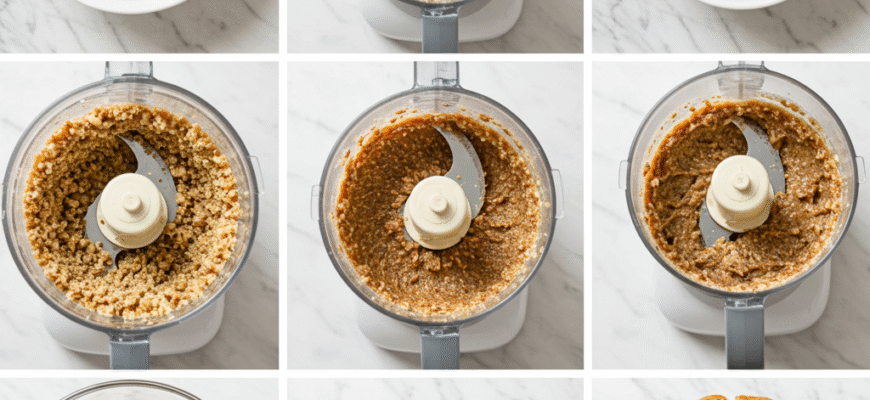
Place the (preferably toasted and slightly cooled) walnuts into the bowl of your food processor. Secure the lid tightly. Now, turn it on and let the transformation begin. This process takes time, typically anywhere from 10 to 20 minutes, depending on your machine’s power and the walnuts themselves. Be patient! You’ll witness several stages:- Loud Crumb Stage: Initially, the walnuts will be pulverised into coarse crumbs. It will be noisy! (This takes maybe 30 seconds to a minute).
- Fine Meal Stage: The crumbs will become finer, resembling a sandy meal. (1-2 minutes).
- Clumpy Paste Stage: The mixture will start sticking together, forming clumps and possibly a large ball that thuds around the processor bowl. You’ll likely need to stop and scrape down the sides and break up the ball with your spatula. (3-7 minutes).
- Getting Creamy: Keep processing! The oils will start to release more fully, and the mixture will gradually become smoother and more paste-like. It might look slightly grainy or thick at this point. Keep scraping the sides periodically. (8-15 minutes).
- Smooth Butter Stage: Finally, with continued processing, the walnut butter will loosen up significantly, becoming smoother, creamier, and spreadable. It might not be as utterly smooth as commercial peanut butter, often retaining a slight texture, which many people enjoy. Stop when it reaches your desired consistency. (10-20+ minutes total).
Important Processing Note: Food processors can overheat during long processing times. Pay attention to your machine. If it feels excessively hot or smells strained, turn it off and let it rest for 10-15 minutes before continuing. It’s also crucial to scrape down the sides regularly to ensure even blending and prevent the motor from working too hard on just one clump.
Step 3: Season and Flavour (Optional)
Once the butter is smooth, it’s time to add any optional ingredients. Add your salt, sweetener (start small!), or flavourings like vanilla or cinnamon. Process for another 30-60 seconds to fully incorporate everything. Taste and adjust seasonings if needed.Step 4: Achieving Perfect Creaminess
If, after extensive processing, your walnut butter still seems too thick or isn’t quite as creamy as you’d like, this is where a little oil comes in handy. With the processor running, drizzle in 1 teaspoon of your chosen neutral oil (or walnut oil). Let it process for another minute. Add a second teaspoon only if necessary. This usually does the trick to bring it to a lovely, smooth consistency.Troubleshooting Common Issues
Butter Isn’t Getting Smooth: The most common reason is simply not processing long enough. Patience is key! Keep scraping down the sides and let the machine run. Ensure your walnuts were fresh and, ideally, toasted. If it’s truly stuck, adding a tiny bit of oil can help lubricate the mixture. Processor Overheating: As mentioned in the warning, give your machine breaks if it feels too hot. Don’t force it. Butter Tastes Bitter: This usually points to stale or burnt walnuts. Ensure you’re starting with fresh nuts and watch them carefully during toasting.Playing With Flavours: Walnut Butter Variations
Plain walnut butter is fantastic, but feel free to experiment!- Maple Cinnamon: Add 1-2 tsp maple syrup and 1/2 tsp cinnamon.
- Vanilla Bean: Scrape the seeds from half a vanilla bean or add 1/2 tsp vanilla extract.
- Chocolate Walnut: Add 1-2 tbsp cocoa powder and your preferred sweetener to taste. A pinch of salt enhances the chocolate flavour.
- Spiced Chai: Add 1/2 tsp cinnamon, 1/4 tsp ginger, 1/4 tsp cardamom, and a pinch of cloves.
- Savoury Herb: Add a pinch of dried rosemary or thyme and a little extra salt (omit sweetener). Great for savoury applications.


