
Content
What Exactly is Vegetable Fermentation?
At its heart, vegetable fermentation is a process driven by beneficial microorganisms, primarily Lactic Acid Bacteria (LAB). These tiny helpers are naturally present on the surface of vegetables. When you create the right environment – specifically, one without oxygen (anaerobic) and with the correct amount of salt – these LAB get to work. They consume the natural sugars within the vegetables and convert them into lactic acid. This lactic acid is key: it acts as a natural preservative, inhibiting the growth of spoilage microbes, and it’s what gives fermented foods their characteristic tangy, sour flavor profile. It’s different from pickling, which typically relies on adding vinegar (acetic acid) to preserve and flavor vegetables. Fermentation creates its own acidity through a living biological process.Why Bother Fermenting Your Own Vegetables?
There are plenty of great reasons to dive into home fermentation! Firstly, flavor. Fermentation unlocks incredible depth and complexity in vegetables. Think beyond simple sourness – you get umami, savory notes, and a unique tang that enhances the base vegetable’s taste. Sauerkraut isn’t just sour cabbage; it’s a complex condiment. Kimchi is a symphony of spicy, pungent, sour, and savory flavors. Secondly, preservation. This was the original purpose! Fermenting allows you to extend the life of seasonal produce, reducing food waste and letting you enjoy summer’s bounty well into the colder months. Thirdly, it’s a fascinating and engaging process. Watching bubbles appear, smelling the changing aroma, and tasting the transformation is a genuinely satisfying kitchen activity. While often associated with beneficial live cultures, the primary focus here is the culinary adventure – creating delicious, preserved foods with unique tastes and textures.Gathering Your Simple Supplies
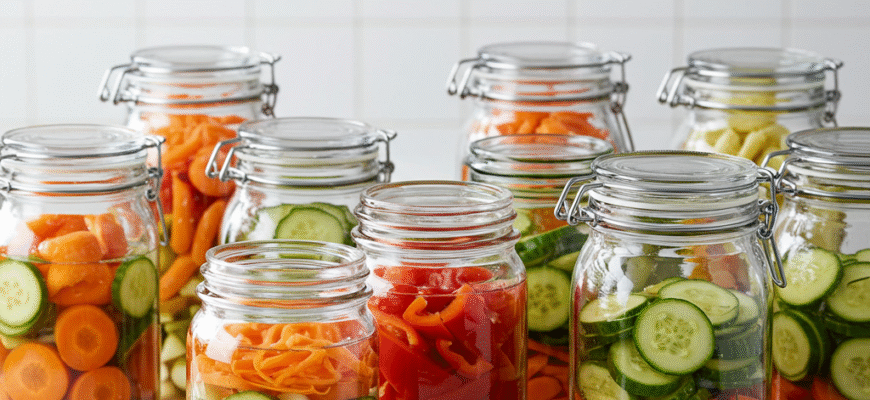
You don’t need a laboratory setup to start fermenting. Here’s the basic kit:- Vegetables: Choose fresh, good-quality produce. Cabbage (for sauerkraut or kimchi), carrots, cucumbers, radishes, green beans, cauliflower, peppers, garlic scapes, and turnips are all excellent candidates. Organic is great if possible, as it may harbor more beneficial native bacteria, but conventional works fine too – just wash it well.
- Salt: This is crucial. Salt helps draw water out of the vegetables to create brine, keeps the vegetables crisp, and inhibits unwanted bacteria while favoring the good LAB. Use non-iodized salt like sea salt, kosher salt, or pickling salt. Iodine can potentially inhibit the fermentation process. The amount is important, usually calculated by weight.
- Water: If making a brine, use chlorine-free water. Chlorine can hinder the beneficial bacteria. Filtered water, distilled water, or tap water left out overnight (to allow chlorine to dissipate) are good choices.
- Jars: Wide-mouth glass jars (like Mason jars) are ideal. Ensure they are very clean. The size depends on the batch you want to make.
- Fermentation Weights: You need something to keep the vegetables submerged under the brine. This is critical to prevent mold. You can buy specific glass or ceramic fermentation weights, use a small food-grade plastic bag filled with brine (so if it leaks, it doesn’t dilute your ferment), a smaller clean jar filled with water that fits inside the larger jar, or even a clean cabbage leaf folded over the top.
- Lids: You can use standard Mason jar lids, but you’ll need to “burp” the jars daily (slightly unscrew the lid to release built-up gas) during active fermentation. Alternatively, fermentation airlock lids are inexpensive and convenient, allowing gas to escape automatically without letting air in.
Getting Started: Two Main Methods
There are two primary ways to kick off your fermentation journey: dry salting and brine fermenting.Method 1: Dry Salting (The Sauerkraut Way)
This method is perfect for vegetables with high water content, like cabbage. The salt draws out the vegetable’s own juices to create the brine.- Prepare the Veggies: Thinly slice or shred your chosen vegetable (cabbage is classic). You can use a knife, mandoline, or food processor shredding disk.
- Weigh Your Veggies: Place your shredded vegetables in a large bowl and weigh them using a kitchen scale. This is important for calculating the correct salt ratio.
- Calculate and Add Salt: The general rule is 1.5% to 2.5% salt by weight. For example, if you have 1000 grams (1 kg) of cabbage, you would use 15 to 25 grams of salt. Sprinkle the measured salt over the shredded vegetables.
- Massage and Squeeze: This is the hands-on part! Massage and squeeze the salt into the vegetables vigorously for 5-10 minutes. The salt will start drawing out moisture, and the vegetables will soften and become limp. Keep going until you have a decent amount of liquid (brine) in the bottom of the bowl.
- Pack the Jar: Tightly pack the salted vegetables into your clean jar, a handful at a time. Press down firmly with your fist, a tamper, or a wooden spoon after each addition. The goal is to eliminate air pockets and force the brine to rise above the vegetables.
- Submerge and Weight: Ensure the vegetables are completely submerged under their own brine. If needed, you can top it off with a little extra brine (made by dissolving ~1 tablespoon salt in 2 cups of water), but usually, enough liquid is drawn out. Place your fermentation weight on top to keep everything submerged. Leave at least an inch of headspace at the top of the jar.
- Cover and Ferment: Seal the jar with your chosen lid (airlock or regular lid). Place the jar on a plate or tray (to catch potential overflow) in a cool, dark place, ideally around 60-75°F (15-24°C).
Method 2: Brine Fermenting (The Pickle Approach)
This method is used for chunkier vegetables or those with lower water content, like carrots, cucumbers, green beans, or cauliflower florets.- Prepare the Veggies: Wash and chop your vegetables as desired – sticks, rounds, spears, or leave small ones whole (like green beans or small cucumbers).
- Make the Brine: Prepare a salt brine. A common ratio is about 2 tablespoons of non-iodized salt per quart (about 1 liter) of chlorine-free water. This creates roughly a 3.5-5% brine solution. Stir until the salt is completely dissolved. You can gently warm the water to help dissolve the salt, but let it cool completely before pouring over your vegetables.
- Pack the Jar: Place your prepared vegetables into the clean jar. You can pack them fairly tightly. Feel free to add flavorings at this stage: garlic cloves, dill sprigs, mustard seeds, peppercorns, bay leaves, or chili flakes are popular additions.
- Pour the Brine: Pour the cooled brine over the vegetables, ensuring they are completely covered. Again, leave at least an inch of headspace at the top.
- Submerge and Weight: Use your fermentation weight(s) to keep all the vegetable pieces below the surface of the brine. This is vital to prevent mold growth on exposed bits.
- Cover and Ferment: Seal the jar with your lid and place it on a plate in a cool, dark spot, following the same temperature guidelines as for dry salting.
The Waiting Game: Temperature and Time
Fermentation is a living process influenced by temperature. Room temperature (around 60-75°F or 15-24°C) is generally the sweet spot. Warmer temperatures speed up fermentation, which might lead to softer textures, especially with things like cucumbers. Cooler temperatures slow it down, potentially resulting in crisper ferments and allowing more complex flavors to develop over time. There’s no exact timetable. Simple ferments like sauerkraut or carrot sticks might be pleasantly tangy after just 3-7 days. More complex flavors can develop over weeks. The best approach? Taste it! Start tasting after about 3 days. Use a clean fork, push the weight aside slightly, grab a piece, replace the weight, and reseal. Does it taste pleasantly sour? Is the raw edge gone? If yes, you can move it to the fridge. If you want more tang or complexity, let it keep fermenting, tasting every day or two.Signs of a Happy Ferment
How do you know things are working correctly? Look for these positive signs:- Bubbles: Especially in the first few days, you’ll likely see bubbles rising to the surface. This is carbon dioxide, a byproduct of the LAB doing their work. It’s a great sign!
- Cloudy Brine: The clear brine will likely become cloudy as the bacteria multiply. This is perfectly normal.
- Sour Aroma: The jar should develop a pleasant, clean, sour smell, like pickles or fresh sauerkraut.
- Tangy Taste: The flavor will shift from salty and raw to pleasantly sour and tangy.
Important Safety Note: Always use clean jars and equipment. Ensure vegetables stay fully submerged beneath the brine throughout fermentation to prevent mold. While surface kahm yeast (a white, film-like substance) can often be skimmed off, discard any ferments showing signs of fuzzy mold (blue, green, black, pink) or smelling putrid, rotten, or ‘off’. When in doubt, throw it out – your safety is paramount.
Troubleshooting Common Issues
Sometimes things don’t go exactly as planned. Here are a few common hiccups:- White Film on Top (Kahm Yeast): This is usually harmless yeast that forms on the surface when exposed to air. It looks like a thin, white, possibly wrinkly film. While not ideal (it can affect flavor if left too long), you can usually just skim it off carefully. Ensure your veggies are still submerged.
- Fuzzy Mold: Blue, green, black, pink, or fuzzy white spots are bad news. This indicates contamination, often because vegetables weren’t fully submerged. Unfortunately, mold spores can spread unseen throughout the jar, so the safest course is to discard the entire batch.
- Slimy Texture: This can sometimes happen, especially in warmer temperatures or if the salt concentration was a bit low. Sometimes it resolves itself if you let it ferment longer, or you might just need to adjust your process next time. If it smells bad along with being slimy, discard it.
- Mushy Vegetables: Can be caused by fermenting too long, too high temperatures, using salt with additives, or starting with older produce. Try a shorter ferment time or a cooler location next time. Adding a tannin source like a grape leaf, horseradish leaf, or black tea leaf can sometimes help keep pickles crisp.


