
Content
First Things First: Know Your Farro
Before you even think about putting a pot on the stove, you need to understand what kind of farro you have. This is crucial because it dictates the cooking time and whether or not you need to soak it beforehand. You’ll generally encounter three main types:- Whole Farro: This is the grain in its most intact form, with the bran and germ still attached. It offers the most nutrients and the chewiest texture, but it absolutely requires soaking (ideally overnight, or at least 8 hours) and takes the longest to cook (around 30-40 minutes or more after soaking).
- Semi-Pearled Farro (Semi-Perlato): Some of the bran has been removed, but it still retains a good amount of fibre and nutrients. It cooks faster than whole farro (typically 20-30 minutes) and usually doesn’t require soaking, though a short soak can speed things up slightly. It strikes a nice balance between texture and convenience.
- Pearled Farro (Perlato): All of the bran has been removed. This type cooks the fastest (often 15-20 minutes) and doesn’t need soaking. While it’s the most convenient, it has less fibre than the other varieties and a slightly softer texture. It’s often the most common type found in standard supermarkets.
The Stovetop Method: Your Go-To Technique
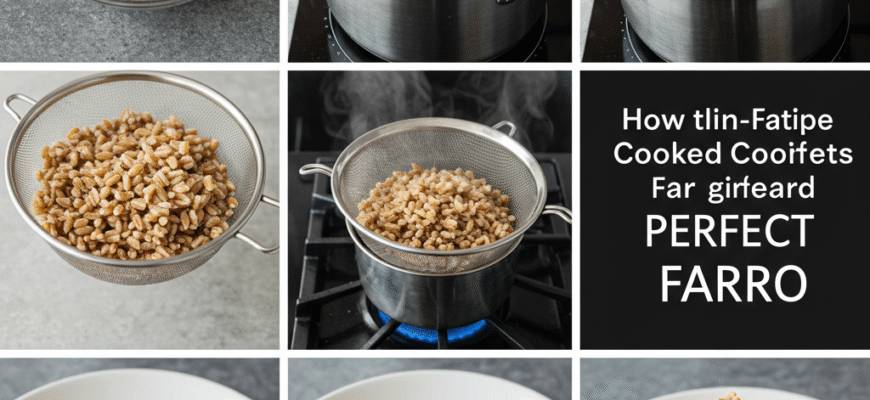
Cooking farro on the stovetop is reliable and gives you excellent control. Here’s the basic process, adaptable for whichever type of farro you have (adjusting cooking times accordingly):Step 1: Rinse Thoroughly
Just like quinoa or rice, farro benefits immensely from a good rinse. Place your measured farro in a fine-mesh sieve. Run cold water over it, swishing the grains around with your hand, until the water runs clear. This isn’t just about removing dust or potential debris; it also washes away excess surface starch, which helps prevent the grains from becoming gummy or sticking together too much during cooking. Don’t skip this step – it makes a noticeable difference to the final texture.Step 2: Choose Your Liquid and Ratio
You can cook farro in water, but using broth (vegetable, chicken, or even mushroom) adds a fantastic layer of flavour right from the start. A general guideline for the liquid-to-farro ratio is 3 parts liquid to 1 part farro (e.g., 3 cups liquid for 1 cup dry farro). This usually provides enough liquid for the farro to absorb fully without needing constant watching, though you might need to drain a little excess liquid at the end, especially with pearled varieties.Step 3: Flavour Boost (Optional but Recommended)
Now’s the time to infuse even more flavour! Add a generous pinch of salt to your cooking liquid (essential!). You can also toss in aromatics like a bay leaf, a couple of peeled garlic cloves (smashed slightly to release more flavour), a sprig of fresh rosemary or thyme, or even a strip of lemon peel. These subtle additions permeate the grains as they cook, making the finished farro even more delicious.Step 4: The Cooking Process
Combine the rinsed farro, your chosen liquid, salt, and any optional aromatics in a medium-sized saucepan. Bring the mixture to a rolling boil over medium-high heat. Once it’s boiling vigorously, immediately reduce the heat to low – you want a gentle simmer, not a turbulent boil. Stir the farro once, then cover the pot tightly with a lid. Let it simmer gently.Always check your specific package instructions! Farro types and brands can vary significantly in their recommended cooking times and even liquid ratios. The times provided here are general guidelines; your package is the most accurate source. Trust the package first, then adjust based on your results.
Step 5: Simmer and Test for Doneness
Now comes the waiting game, but stay vigilant. The cooking time depends heavily on the type of farro:- Pearled Farro: Start checking around 15 minutes. It’s often done in 15-20 minutes.
- Semi-Pearled Farro: Begin checking around 20 minutes. Expect it to take 20-30 minutes.
- Whole Farro (Soaked): Start checking around 30 minutes. It usually needs 30-40 minutes, sometimes longer.
Step 6: Drain (If Necessary) and Rest
Once the farro reaches your desired tenderness, check the pot. Is there excess liquid? If so, pour the farro into your fine-mesh sieve to drain it off thoroughly. If the liquid has been fully absorbed and the farro isn’t sticking to the bottom, you can skip the draining. Whether you drained it or not, return the farro to the warm pot (off the heat), put the lid back on, and let it rest for 5-10 minutes. This resting period allows the grains to absorb any remaining steam, firm up slightly, and become fluffier.Step 7: Fluff and Serve
After resting, remove the lid. If you added any large aromatics like a bay leaf or herb sprig, remove and discard them now. Use a fork to gently fluff the farro, separating the grains. Your perfectly cooked farro is now ready to be used!Exploring Other Cooking Methods
While the stovetop simmer is classic, there are other ways to cook farro:- Pasta Method: Especially good for pearled or semi-pearled farro. Bring a large pot of generously salted water to a boil, just like you would for pasta. Add the rinsed farro and boil uncovered until it’s tender to your liking (start checking after 15 minutes). Drain it thoroughly in a colander. This method often yields nicely separated grains.
- Pressure Cooker (Instant Pot): This significantly speeds up the process, especially for whole farro. Rinse the farro, combine it with liquid (often a lower ratio, like 1:2 farro to liquid, is needed – check your cooker’s manual) and salt in the pot. Cook on high pressure for times ranging from 10-12 minutes for pearled/semi-pearled to 15-20 minutes for whole (after soaking), followed by a natural pressure release for about 10 minutes.
- Rice Cooker: Many basic rice cookers can handle farro. Use the same 1:3 farro-to-liquid ratio as the stovetop method, add salt, and use the brown rice setting if available, or the standard white rice setting (you may need to run the cycle or add more liquid if it finishes before the farro is tender).
Pro Tips for Farro Excellence
Ready to elevate your farro game even further? Try these tips:- Embrace Soaking (for Whole Farro): We mentioned it before, but it bears repeating for whole farro. Soaking not only drastically reduces cooking time but also helps make the grains more digestible and ensures even cooking. Don’t skip it if you’re using the whole grain variety.
- Toast for Flavour: Before adding any liquid, try toasting the rinsed and drained farro. Heat a tablespoon of olive oil or butter in your saucepan over medium heat. Add the farro and stir constantly for 2-3 minutes until the grains become fragrant and lightly golden. This simple step intensifies the farro’s natural nutty flavour beautifully. Then, add your liquid and proceed with cooking.
- Broth is Better: Seriously consider using broth instead of water. It makes a world of difference, infusing the grains with savoury depth that water alone cannot achieve.
- Mind the Simmer: Once you reduce the heat after the initial boil, ensure it’s a *gentle* simmer. Boiling farro too vigorously can cause the grains to break down and become mushy, especially the pearled variety.
- Taste, Taste, Taste: Cooking times are estimates. Start tasting a few minutes before the suggested time is up. The ideal “al dente” chewiness can be subjective, so cook it until it’s perfect for *you*.
- Don’t Let it Sit in Water: If you need to drain your farro, do it promptly once it’s cooked. Letting it sit in excess cooking liquid after it’s done can lead to waterlogged, softer grains.


